This is my second post of the day. If you’re looking for my Butterfly Reflections Ink card, please scroll down or click here!
Good morning! Sorry I didn’t have a post yesterday…I realized that it was the first day I’ve skipped since January. As you’ll see, I was a little busy with this project over the last few days. Just a warning…this is a long, photo-heavy post…but I think it’s worth it!
When I was younger my parents hosted several Japanese exchange students in our home. When they went back to Japan we stayed in touch and they would send the most elaborate greeting cards to us for birthdays and holidays. The cards would play music, they’d light up, they’d move…in the early 90s this was a totally unheard of concept in American greeting cards and I was enthralled. We still have those cards and despite me turning them on repeatedly during my childhood many still light up and play music…
A few weeks ago I was thinking about those cards and wondered if the technology to add sound or lights to cards had been made available to hobby crafters. After a bit of googling I stumbled upon Chibitronics and opened up a whole new world of cardmaking!! I purchased their starter kit and completed my first project today!
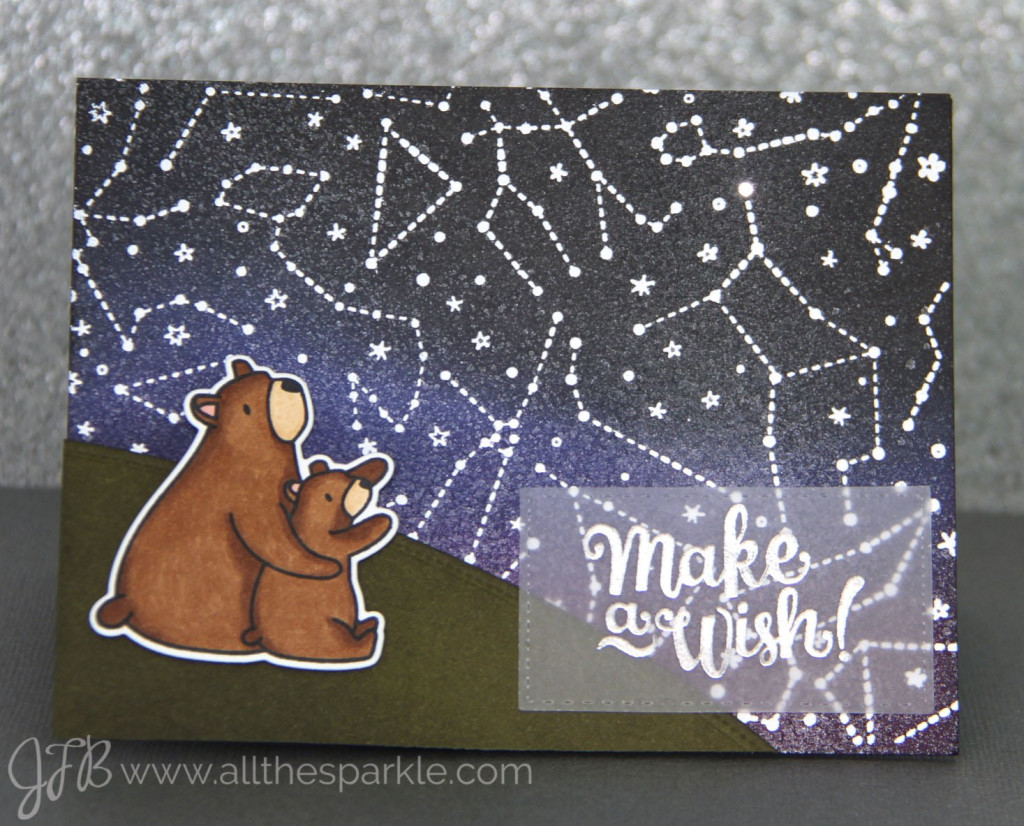
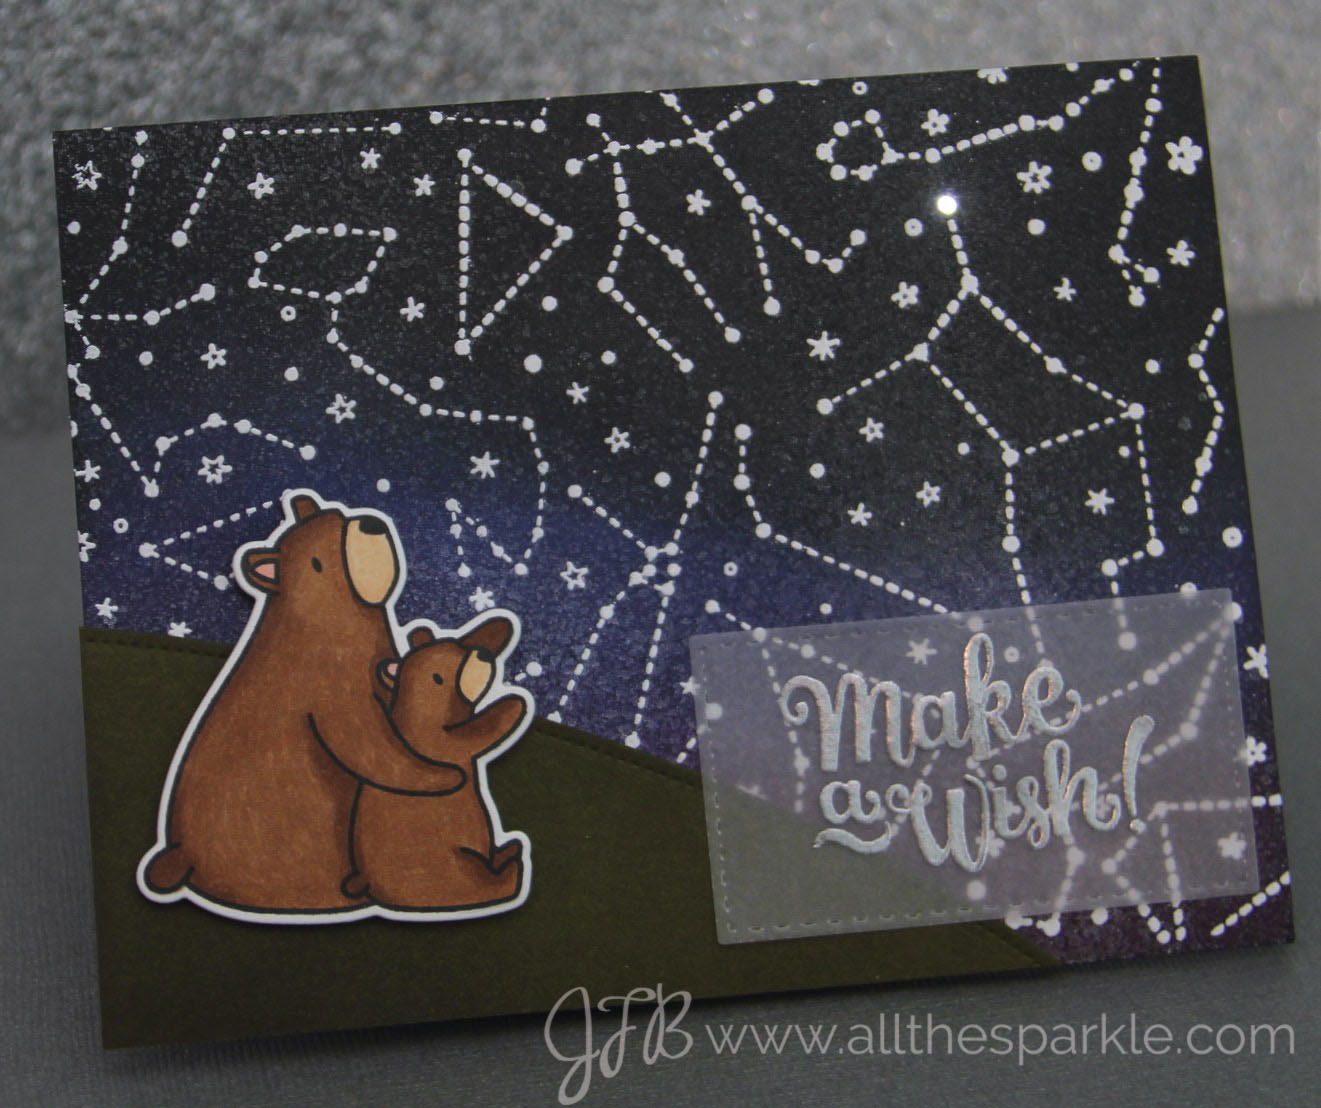
Here’s my finished card:
 And here’s what it looks like when you turn down the lights!!! 😉
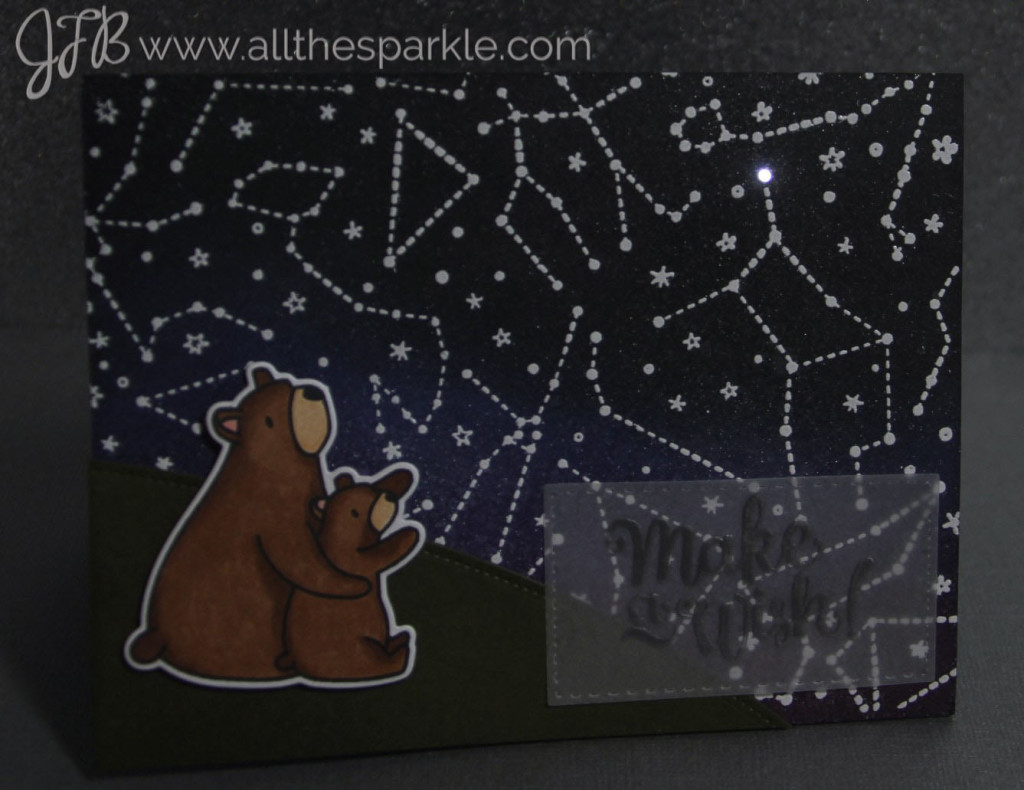 Can you see the shining star the bears are wishing on? I can’t even begin to tell you how excited I was when it actually worked!
But let me back up just a bit! When you purchase the starter kit from Chibitronics they send you this instructional sketchbook, copper tape, 30 LEDs in 4 colors, 2 batteries, and clips to make several light-up projects. The sketchbook is so cute…it walks you through trying out various patterns and circuits and gives you the creativity to customize your sketchbook. You could simply complete the sketchbook with the materials they provide and be totally thrilled with your results….but I had something a little different in mind!
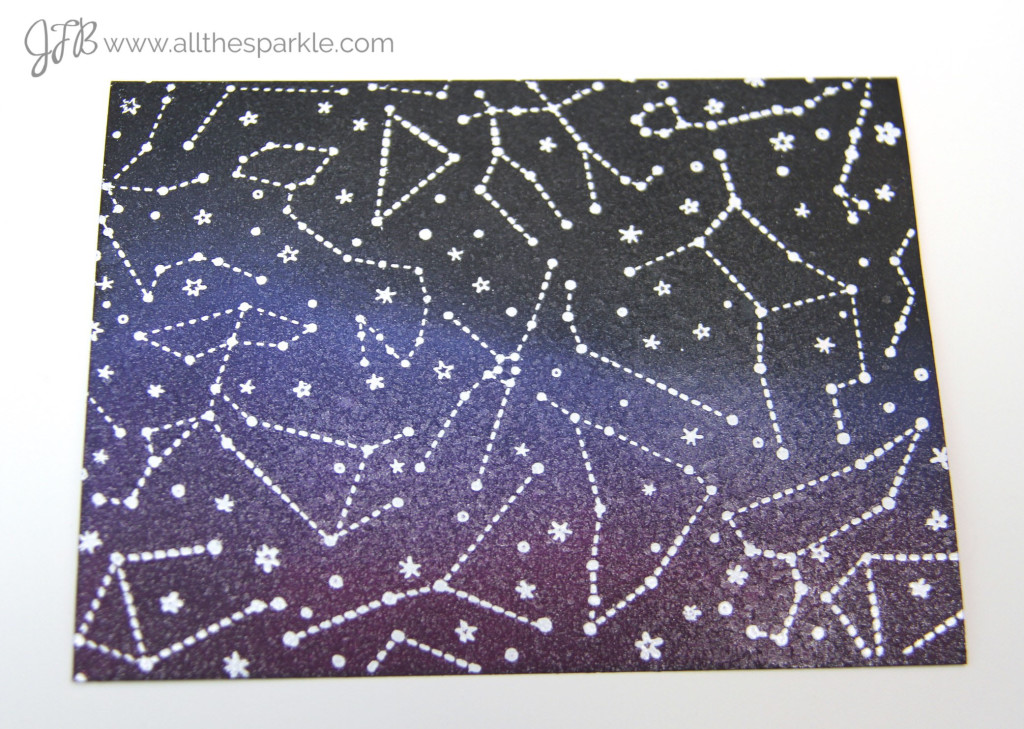
 I started off by blending distress inks onto a piece of white cardstock to create my night sky. I used Seedless Preserves, Chipped Sapphire, and Black Soot. Once it was totally dry I stamped the Hero Arts Constellation background stamp with versamark and then heat-embossed it with white embossing powder. Next I spritzed the entire panel with water and then dabbed the water off to create lighter patches throughout the sky. Finally I sprayed it with Tsukineko Frost spray to add a lot of shimmer. A LOT. This panel practically blinds you when it catches the light…but it reminds me of a starry summer sky!
Next I stamped the bears from the Mama Elephant Bear Hugs set with Memento Tuxedo Black ink and colored them with copic markers. I also cut a hillside with the Mama Elephant Borderline Trio out of green cardstock and added a little extra color and shading with Forest Moss distress ink. Then I die-cut a rectangle of vellum using the Simon Says Stamp Stitched Rectangles dies and stamped the Mama Elephant Make a Wish sentiment with versamark and heat-embossed it with Ranger silver embossing powder. Once all the pieces were complete I adhered the hill, bears, and sentiment to the sky panel and then set the panel aside to work on the LED component!
First I selected the star I wanted to light up and used a tiny hole punch to cut out the center of the star. Then I lined up a piece of black cardstock behind the sky and used a pencil to mark the hole on the black cardstock.

Then I traced the circuit on the black cardstock so I’d know where to place the copper tape. The LED light has a positive and negative side and you’ll need to connect the copper tape from the positive and negative side of the battery to the LED light. Here’s my sketch circuit.
 And here’s my finished circuit without the battery:
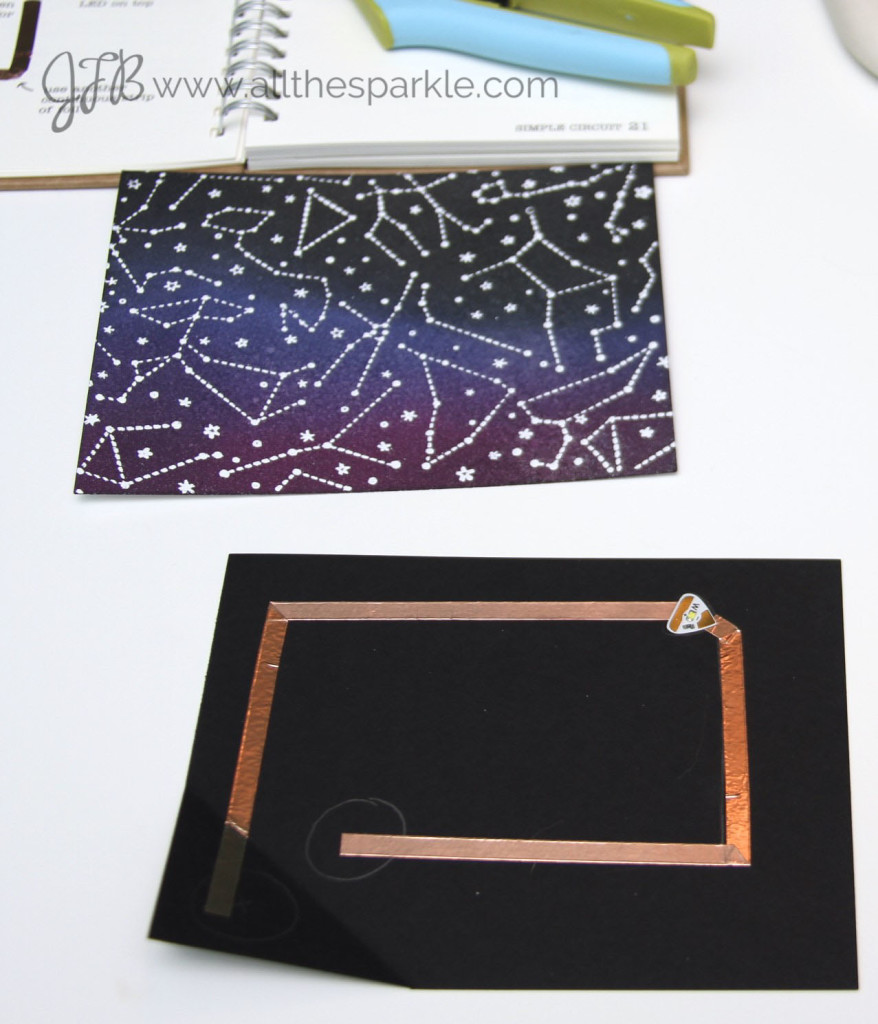 I’ve gotten progressively better at laying down the copper tape each time. I’ve learned that it’s best to leave the backing on and just expose a little bit at a time so that it doesn’t stick everywhere. If the tape rips you can’t really make a good connection by just laying another piece of tape down on top so it’s important to try to use a single layer of tape for the best results. The book gives great photos on how to make turns without ripping the tape.
Finally it was assembly time! I started off by glueing battery down onto the negative side making sure to keep the adhesive off of the copper tape. I don’t know if that would make a difference or not but I decided not to risk the connection between the battery and the tape. Then I scored and folded the positive side down over the top of the battery. Next I added a double layer of foam tape to the piece of black cardstock to match the height of the battery. The two layers of foam tape are a little higher than the battery which means that the card won’t turn on unless it’s pressed and for battery conservation, that is what I wanted. I lined up the hole in the night sky with the LED light and then adhered the panels together.
I added the panel to a black cardstock base, crossed my fingers, pressed down on the mother bear’s paw, and this is what happened…
Whew…I mean, HOORAY! 😉 I love that the card is totally fine as is but the light component just adds a little something extra special! (I apologize for the not-so-great video…still working on that…)
When I send the card I’ll include a little note telling the recipient to press the mother bear’s paw and “make a wish.” I’m definitely going to continue experimenting with adding LED lights to cards. There are instructions in the book for chaining lights together and there are additional options at the Chibitronics website for adding music, light sequences, and more! I have SO many ideas running through my head…I’m going to have to order more lights!
Here’s a final look at my card:
Thanks for visiting today and a very special thanks if you made it all the way through this post! I’d love to know what you think about adding lights to cards!
I’m entering this card into Virginia’s View Challenge #14: Layers and Dimension!


SUPER fun!
Just Amazing! I love this.
Awesome…for the kid in us all
Wow, what a fun card and so pretty too!
Jessica this is amazing, I just love those lights. Gail xx
This is absolutely the cleverest card ever!!! I love the light you installed, that is just SO AWESOME!!
That is so amazing! It’s a perfect night scene and then, BAM! It just gets better! it’s so cool!
WOW, just amazingly beautiful!!! (I’m seeing this post quite a long time after you posted it, but I am SO glad that I stumbled onto it!!) I know this is a difficult request but I’m going to ask anyway (hehe), would you consider doing a video of the construction of the card & how you did the circuitry?
This is such a cool card, and I just love it!!!!
Hugs, Erin 😀