• Bloglovin
  • Facebook
  • Instagram
  • Pinterest
  • RSS
  • Twitter
  • YouTube

all the sparkle

jessica frost-ballas

  • home
  • about me
    • about
    • creative resume
    • disclosure
    • house tour
  • Disclosure
  • craftroom
  • video tutorials
  • patreon
  • contact

Missing You (+VIDEO)

9 Feb

Good morning!  After posting my Christmas Card Challenges card this weekend I received a few requests for a tutorial using the Chibitronics LED light stickers so I decided to get over my fears and do a video!

I did things a little differently this time and would love your feedback!  Over the summer I realized that I just cannot create and talk at the same time…so this time I recorded my video while binge-watching Grey’s Anatomy and then added a voiceover.  I’m hoping the sound quality is acceptable and that things line up correctly…please feel free to offer advice or suggestions!  Anyway, *deep breath*…here goes!

Watch on Youtube

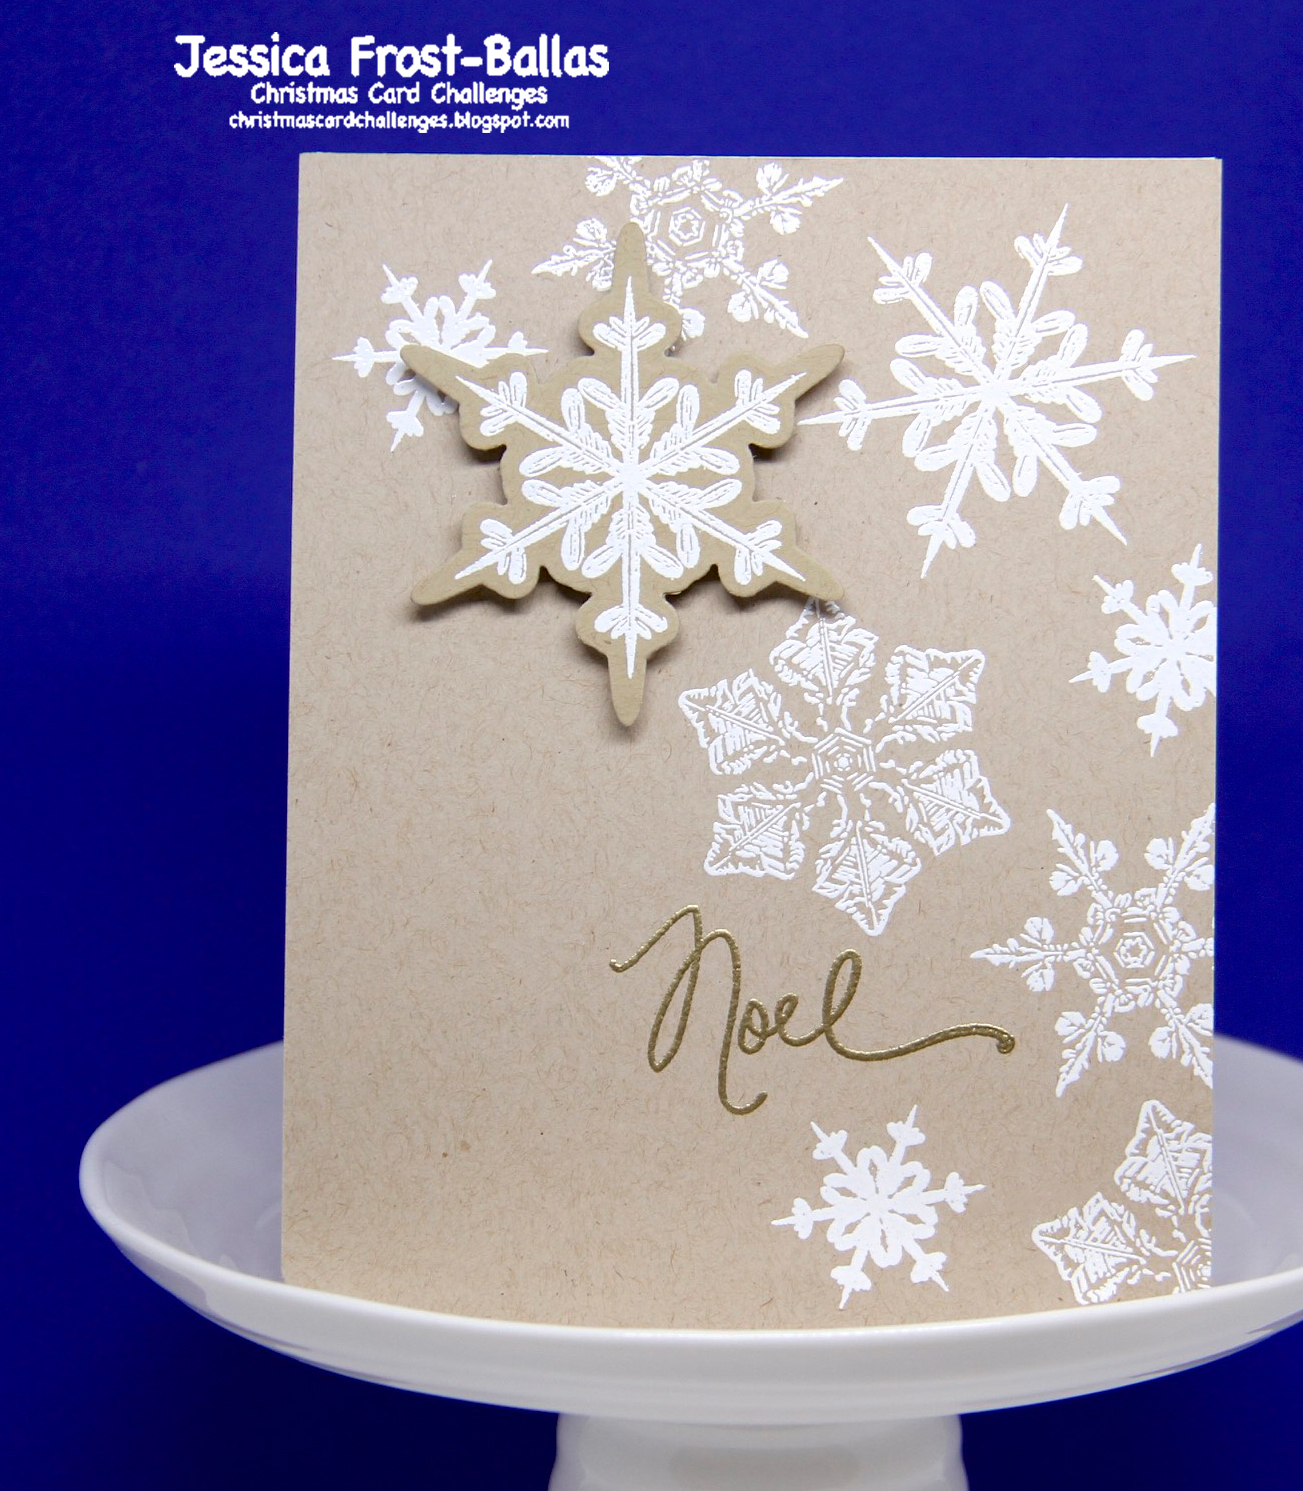
I wanted to create a card using a similar circuit to my card from Sunday but I didn’t want to make the exact same design so I decided to use this fun scene-building set from Concord & 9th to create a starry summer night sky!

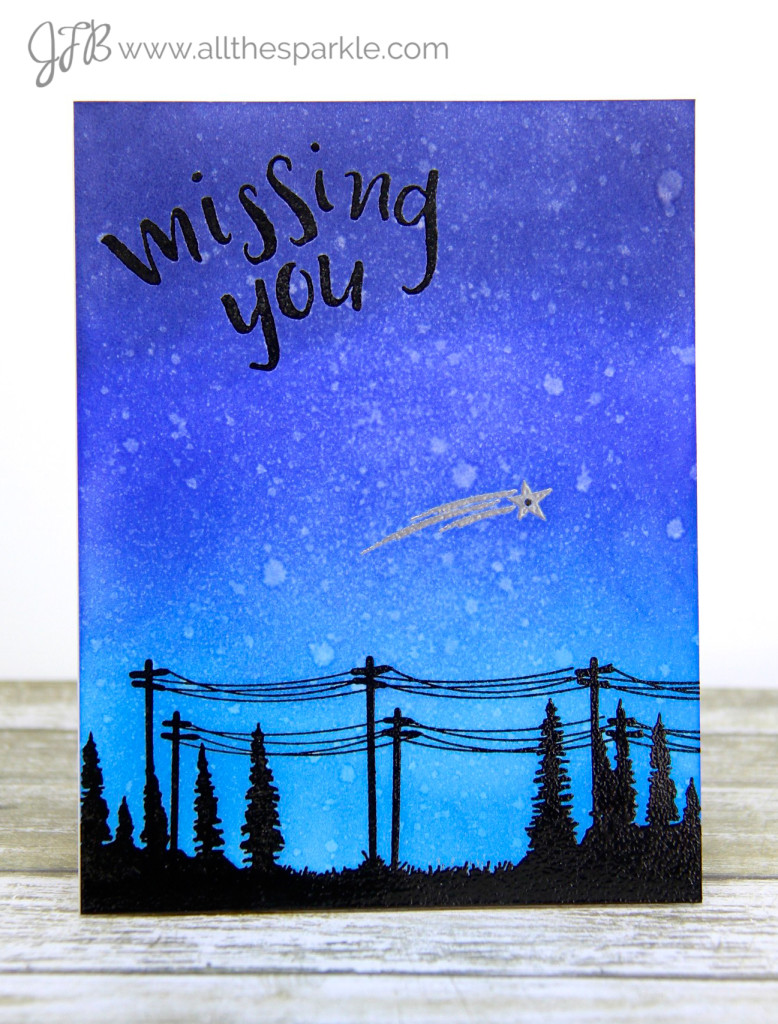
If you wanted to create this card without the lighted element you could add stickles or a gemstone to the star for a little extra sparkle.  To create this card I stamped the trees, telephone poles, and sentiment from Concord & 9th’s Written in the Stars (which I mistakenly identified as Missing You in the video…oops!) with versafine and heat-embossed them with clear embossing powder.  I used my MISTI to repeatedly align and stamp the telephone poles.  I stamped the shooting star in versamark and heat-embossed it with silver embossing powder.  Next I blended salty ocean, blueprint sketch, and chipped sapphire distress ink to my panel and spritzed it with water to create stars.  While that was drying I worked on my circuits.

I punched a tiny hole in the center of the star for my light.  On a smaller separate piece of cardstock I created my circuit with copper foil tape and added a white LED light sticker.  I used a double layer of foam tape to build up the circuit piece so that it would be level with the battery needed to power the LED light (otherwise the card will be lopsided).  Finally I lined up the hole in the star with the LED light and adhered them together!  I create the circuits to be temporary…meaning, they are only lit when they are pressed together.  It’s possible to make them permanent circuits but I prefer to preserve the battery life!

I’m sorry for not explaining the circuit process better but it’s really much easier to explain it via video!  (If you’d like to skip right to that part of the video head to the 00:56 mark!)  You can also see previous cards that I’ve made using the Chibitronics lights here, here, and here!  If you have any questions about the lights please leave me a comment and I’ll try to help you out! 🙂  And a thumbs-up on my Youtube video would be great encouragement if you’d like to see more videos in the future! 😉

Thanks so much for visiting and have a fabulous day!

Supplies:

Interested in the products I used?  To make them easy for you to find, I have listed them below. (Affiliate disclosure can be found here). Your purchases help keep my blog running and I thank you for the support!)

Chibitronics Chibi Lights Circuit Stickers STEM Starter Kit
Chibitronics Chibi Lights LED Circuit Stickers Intro Kit
Chibitronics Chibi Lights Circuit Stickers Sketchbook – Starter Kit
SeeedStudio – Circuit Sticker Effects Kit – Twinkle/Heartbeat/Fade/Blink – DIY Maker Open Source BOO
Chibitronics Copper Tape
Chibitronics White LED Circuit Stickers – Megapack
Chibitronics Circuit Stickers – Red, Yellow, Blue Megapack
Sony CR2032 Lithium Coin Cell 3V 20 Pcs
Concord & 9th Written in the Stars
Neenah Cardstock, Neenah Heavyweight, Classic Crest Solar White 110 lb, 25 pk
Neenah Cardstock, Neenah Classic Crest Solar White, 25 pk
EK Tools Powder Tool, New Package
VersaFine Ink Pad, Onyx Black
VersaMark Ink Pad
Ranger Super Fine Embossing Powder, Silver
Ranger Super Fine Embossing Powder, Clear
WAGNER HT 400 650-Degree Heat Gun
Ranger Ink Blending Tool Replacement Foam, 1 Inch Round
Ranger Ink Blending Tool, 1 Inch Round
Ranger Distress Ink Pad, Salty Ocean
Ranger Distress Ink Pad, Blueprint Sketch
Ranger Distress Ink Pad, Chipped Sapphire
Scotch Acid Free Advanced Tape Glider, Pink Applicator with 2 Rolls of 1/4-Inch Tape (085)
3M Mounting Tape, 3/4-inch x 350 Inches (110-Long)
Martha Stewart Crafts Embossing Stylus Set
Mister Bottle-2 Ounces Empty
Sizzix 660340 Big Shot Plus Cutting/Embossing Machine, White/Gray
InLinkz.com


Share This:
Share on pinterest
Pinterest
Share on facebook
Facebook
Share on twitter
Twitter
Share on email
Email

You May Also Enjoy:

  • Twinkling Stars LED Card with Chibitronics
    Twinkling Stars LED Card with Chibitronics
  • Christmas Card Challenges #16: Photo Inspiration
  • Christmas Card Challenges #25: Photo Inspiration

Comments:
10 Comments
Categories:
card-making, crafting, video tutorial
Tags:
chibitronics, interactive, video tutorial

« Coffee Loving Cardmakers Sponsor Solo: Concord & 9th
Happy Birds »

Comments

  1. Ava Gavloski says

    February 9, 2016 at 9:48 am

    great tut’ on assembling the card. Blending and water marks are perfecto!!

    Reply
  2. glow:) says

    February 9, 2016 at 10:41 am

    WOW…. jess that is awesome! your “techyness” makes you a diy gENIus.. thanks so much for wowing me! and may you have a fabulous day! … your voice is so easy to understand and i really enjoyed! …bless your heart for being so brave! sending lots of love…

    Reply
  3. Lisa M says

    February 9, 2016 at 10:42 am

    You did a fantastic job on the tutorial!! Thanks for sharing. I love the card!!

    Reply
  4. Vera W Yates says

    February 9, 2016 at 10:57 am

    Jess, this looks so cool! Great tutorial. Love it.

    Reply
  5. HJ says

    February 9, 2016 at 11:09 am

    Thanks so much for this great video that makes adding a light to a card seem very simple. I’m going to have to try it. Love the card with the different colors in the sky and the spritzed “stars”. So interesting.

    Reply
  6. Mary schmidt says

    February 9, 2016 at 6:07 pm

    Thanks for the video. I have wondered how those little circuit lights were installed in a card. Paper trey Ink had some 1 piece little lights at Christmas time. I tried unsuccessfully to find them elsewhere on the web. Did you use the ones from Chibitonics(?)?

    Reply
  7. Daria says

    February 9, 2016 at 9:26 pm

    Thank you for the very clear tutorial. I’ve never seen this before. It would be so much fun to add it to Rudolph’s nose on a Christmas card. Your night sky card is beautiful.

    Reply
  8. KT Fit Kitty says

    February 9, 2016 at 9:42 pm

    Awesome card and wonderful video! I enjoyed this very much! I had no idea how these worked – very cool!

    Reply
  9. Colleen Crawford (Queen of Cards) says

    February 9, 2016 at 10:10 pm

    cool card! great tutorial 🙂

    Reply
  10. Shari says

    February 9, 2016 at 11:19 pm

    Wonderful. Thank you for the tutorial. A lot of great information. ???

    Reply

Thanks for taking the time to leave a comment! I read and appreciate all of your thoughts! :) Please know comments are moderated so it may take a few minutes for it to show up!Cancel reply

This site uses Akismet to reduce spam. Learn how your comment data is processed.

Jessica About Me Photo
Hi, I'm Jess! Thanks for visiting my blog where I share my adventures in cardmaking and papercrafting! I hope I can inspire you to craft with a little extra sparkle!

Subscribe Via Email

Enter your email address to subscribe to this blog and receive notifications of new posts by email!

Join 3,247 other subscribers

Crafty Sales (updated regularly)

Favorite Crafty Shops

Previous Posts

Instagram

This error message is only visible to WordPress admins

Error: No connected account.

Please go to the Instagram Feed settings page to connect an account.

Disclosure

I design for several companies because I truly love their products! Anything I recommend on my blog is something that I genuinely love and regularly use. I do not get paid for product reviews and I will never recommend a product that I do not like or would not use.

I am affiliated with several of my favorite crafty companies which means I receive a small commission (at no additional cost to you!!) when you click on one of my links and make a purchase through the store.

You can find my full disclosure as well as a list of the companies I am affiliated with HERE. Thank you so much for supporting me!

Most Popular Posts

(VIDEO) Alcohol Ink Background in Real Time + Celebrating 10K Subscribers Video Hop WINNERS!
Hero Arts August My Monthly Hero Release Blog Hop (+GIVEAWAY!)
VIDEO: Distress Oxide Ink Blending Combos with Kitsch Flamingo
VIDEO: Copic Coloring on Die Cuts - Honey Bee Stamps Summer Stems Video Hop (+GIVEAWAYS!)
Wishing on a star!
Winnie & Walter 4th Birthday Bash Blog Hop (+GIVEAWAYS!)
Zig Clean Color Real Brush Swatch Card Download and a revelation!
Waffle Flower August Release Blog Hop (+GIVEAWAYS!)
STAMPtember Exclusive: Lawn Fawn - Snow Bunnies (+VIDEO!)
More using the Tim Holtz STAMPtember Exclusive

Copyright

Creative Commons License
This work is licensed under a Creative Commons Attribution-NonCommercial-NoDerivs 3.0 United States License.

Copyright © 2025 · Bloom theme by Restored 316

Copyright © 2023 · All The Sparkle